How to setup your store?
After successful sign up of seller account or when you login to your seller account for the first time, you will be welcomed with this “Store Setup” wizard.
Tip: Open this help section in a new tab or print out to follow step by step.
It is most important for a seller to follow these steps carefully, input all details as possible to have a complete online shop. More details the better, It helps Google to index your store properly, help customers search and find your products easily.
It will take less than 5 minutes for any seller to setup their store.
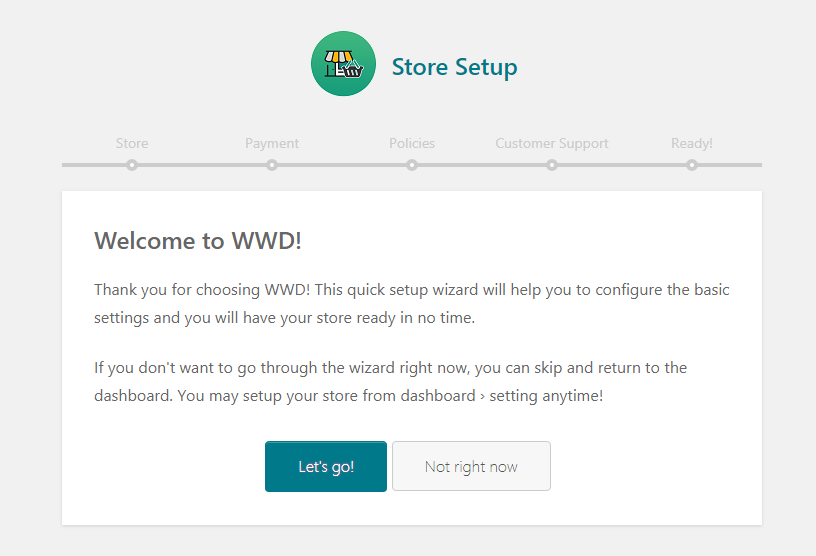
Fill required details in each step, don’t worry you can always come back to your Dashboard to add or edit if needed.
The setup wizard will give you following options to complete:
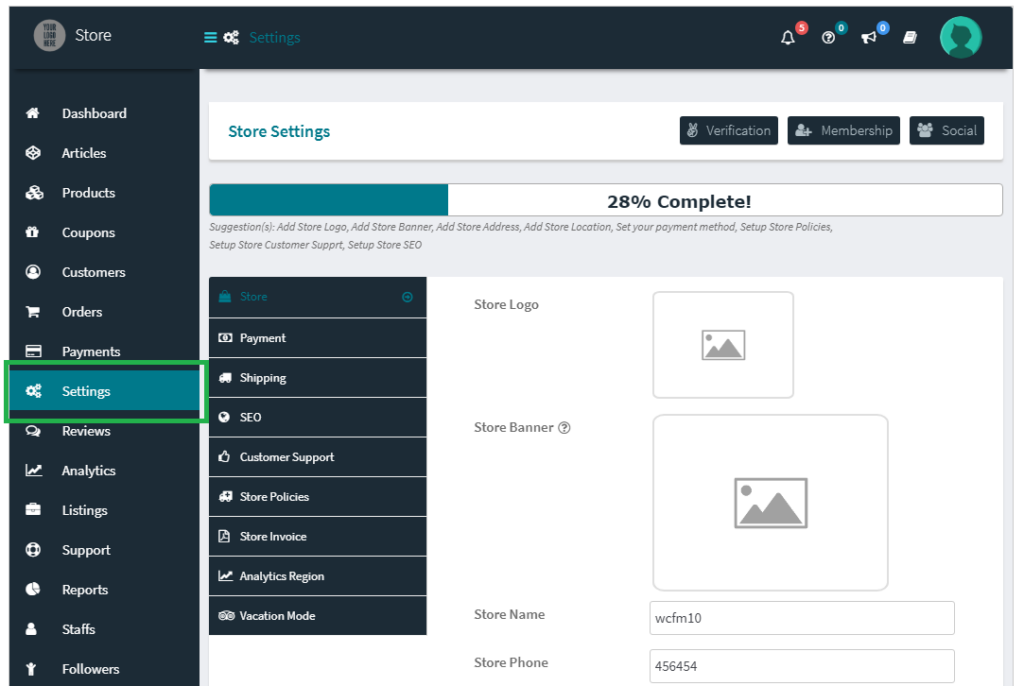
“Store” category will give you options to set most essential parts of your store –
- Logo
- Banner
- Store Name
- Store Slug (same as your store name)
- Store Phone Number
- Store Address
- Store Location

“Payment” category you can skip or continue without entering anything
“Policy setup” Category – Your shop policies
- Policy Tab Label (You can enter your shop name for example “Murugan Flower shop Policies”)
- Shipping Policy (Here you can mention like, you ship your products by Poslaju or pick-up by customer only, do you charge for delivery, how long you will take to deliver etc.)
- Refund Policy (Mention whether you accept refund or what are your terms if customer wants to return a purchased product)
- Cancellation Policy (Mention If order is cancelled will you refund the deposit or cancel within certain time period etc.)
Policies are visible at your store page, product page and order details page.

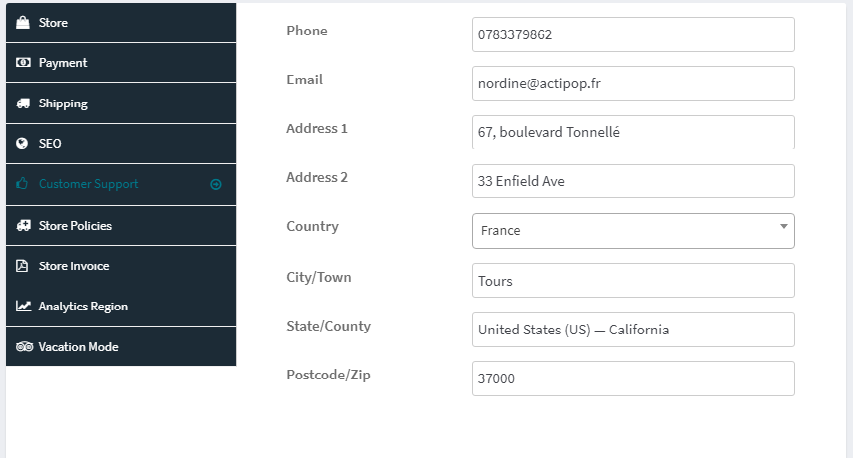
“Customer support” category –
- Support phone
- Support email
- Support address
Mention the details for customers to reach you or visit your physical store. These information are available to customers in your products page.
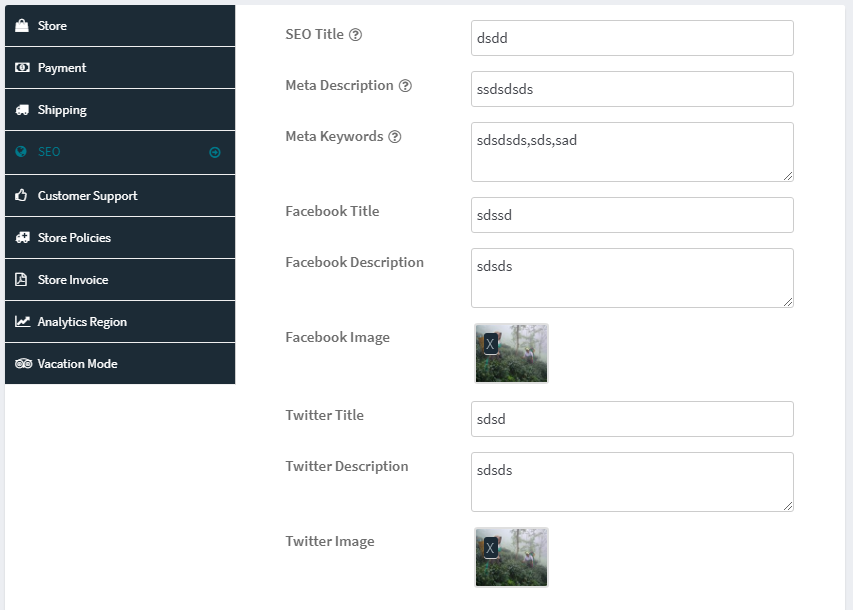
“SEO” Search Engine optimization is nothing but the information Google sees and present to visitors.
- SEO Title (Enter your business name as you want to appear in your store page. For example if you sell flowers instead of “Murugan Shop” you can enter as “Murugan Flower shop” so Google will tell visitors specifically that you are selling flowers.)
- Meta Description ( Enter a short bio of your business)
- Meta Keywords For example (flowers, wedding garland, prayer garland, Jasmine, Valentine roses, Bouquet)
- Facebook Title (When you share your store on Facebook, the information you enter here will appear. So give a nice title, description and image)
- Facebook Description
- Facebook Image
- Twitter Title (When you share your store on Twitter, the information you enter here will appear)
- Twitter Description
- Twitter Image
“Store Social setup”
Enter your social media links in this section, if not skip. It will appear in your store page, so that your customers can follow or visit.
Once the initial setup wizard is complete, you will be in store Dashboard.

If you skipped the setup wizard at the initial login or want to edit. Just go to Dashboard -> Setting. You will see all options there.
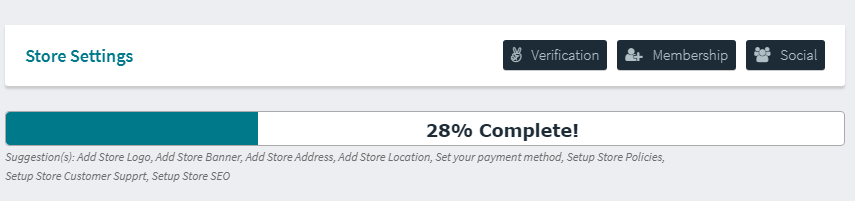
Sellers’s setting page always shows a profile completeness progress bar on top of your store setting page. It shows remaining setting suggestions for you to complete.
In your store Dashboard, you will see a left panel with menu items.
- Home
- Media – Images of products you added
- Products – List of products you added or add new
- Orders – List of orders placed by customers
- Refund – Refund request by customers
- Settings – Store advanced settings
- Ledger book – Your sales report
- Reports – Sales graph by time period
- Reviews – Customers review about your product
How to add a new product?
Go to Products menu -> then click Add New
In Add Product page you will see various options to select and enter
1. Simple Product or Variable Product
Simple Product is for standard items, select variable product if you sell a product that has variable prices for customer to select, For example :-
If you sell Hair oil with different bottle sizes, then you need to mention price for each size, like 200ML is RM10, 250ML is RM15, 300ML is RM20 and so on.
If you sell Potato Chips then you need to set variable prices for 100 grams, 200 grams etc. If you are adding variable product scroll down to Variations menu for more details.
2. Catalog or Virtual or Downloadable
Select Catalog if you are adding a product or service which you dont want to be added to cart or you want to hide the price. Once you enable catalog, scroll down to the Catalog mode menu to set the options. Examples:-
You run a catering service and you are adding a food menu, You run a bridal service and you are adding your portfolio, You are Aircon repair technician and you want to add your services
Select Virtual if you are selling a product which doesn’t require shipping
For example you are a photoshop designer and you send the product by e-mail
Select Downloadable if the product is e-book, music, video, etc.
3. Product Title – Enter the item name
4. Price is original price and Sale price is discounted price. You can run promotion for certain periods (Schedule) with sale price.
5. Upload an image of the product. You can upload many images by selecting the + sign
6. Short description is quick view info about your product, make it short and sweet
7. Description is where you supply complete details about your product.
8. Categories, choose the appropriate category. It will help customers to search your product easily, if you dont see the correct category, e-mail us we will add it, mean while you can use Uncategorized
click the blue question mark icon to learn more about that option
9. Tags helps customers to find your product easily. For example if you sell T-Shirt can enter tags like (t-shirt, men’s fashion, shirt, branded t-shirt, cheap t-shirt, t-shirt sale, Indian design, Unisex, boys, etc.)
10. Inventory Menu
SKU – Stock Keeping Unit – Enter a unique code or name for your product, this will help you to manage your stock effectively. If you have similar or identical products then giving a SKU code will be useful. Customers can easily quote the SKU to enquire about a particular product. example for Red Polo T-Shirt SKU: POLO-TS-Red-XL-01
Manage Stock – If you enable this, then you keep track of your stock.
Stock Status – Select on backorder if the item has to be made only after the booking or purchase, example Catering food, wedding garlands etc.
Sold Individually – If you add a group of products which is also sold separately.
11. Shipping – Enter the weight and dimensions for the customer to know the size of the product
Shipping class – Leave empty
Processing Time – Time you take to ship the product
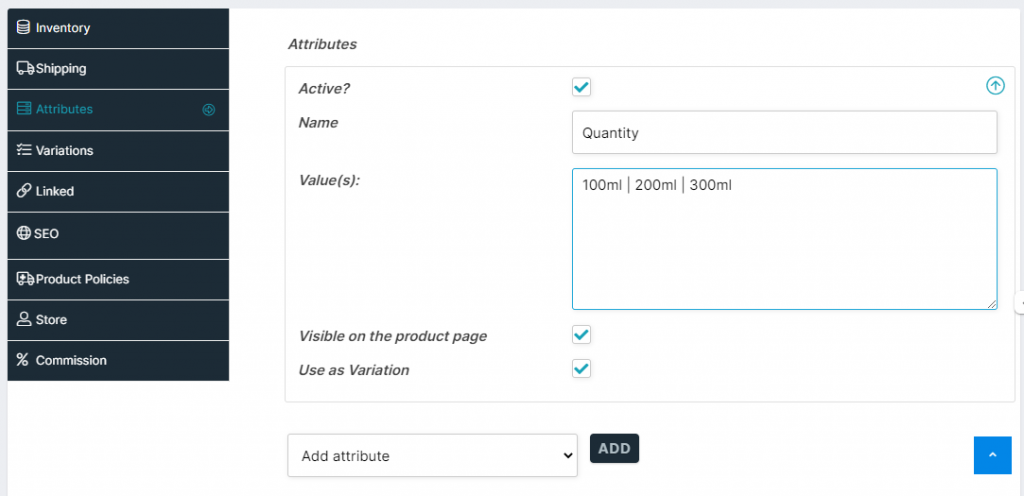
12. Attributes – Add attribute for a product with variations
example if you are selling T-Shirt, then enter a separate attribute for color
Name – Color
Values – Red | Blue | Green
Then you can add another attribute for size
Name – Size
Values – Small | Medium | Large
13. Linked – Promote other products together with a product you add now. Click the blue ? mark for better understanding. You should have already added a product to do this.
14. Product Policies – If you have added store policies during the initial setup you can skip this. Or if you want to specify separate policies for individual products, then you can enter here.
15. Catalog Mode – This menu will appear only when you enable catalog option at the top
Select the option to disable add to cart or hide price
16. Downloadable – This menu will appear only when you enable downloadable option at the top
Give a file name and upload the file for the customer to download after making the purchase.
17. Variations – This menu will appear only when you select product type as Variable.
You need to set the product attributes first to set the Variable price
For example:-
If you are selling Hair oil with different quantity 100ml, 200ml and 300ml. You need to set price for each quantity.
First you go to attributes, Click add attribute then enter
Name – Quantity
Values – 100ml | 200ml | 300ml
Then click variations
Select 100ml and enter the price

Then click the + sign at the right bottom side (will open another variation)
Select 200ml then enter price
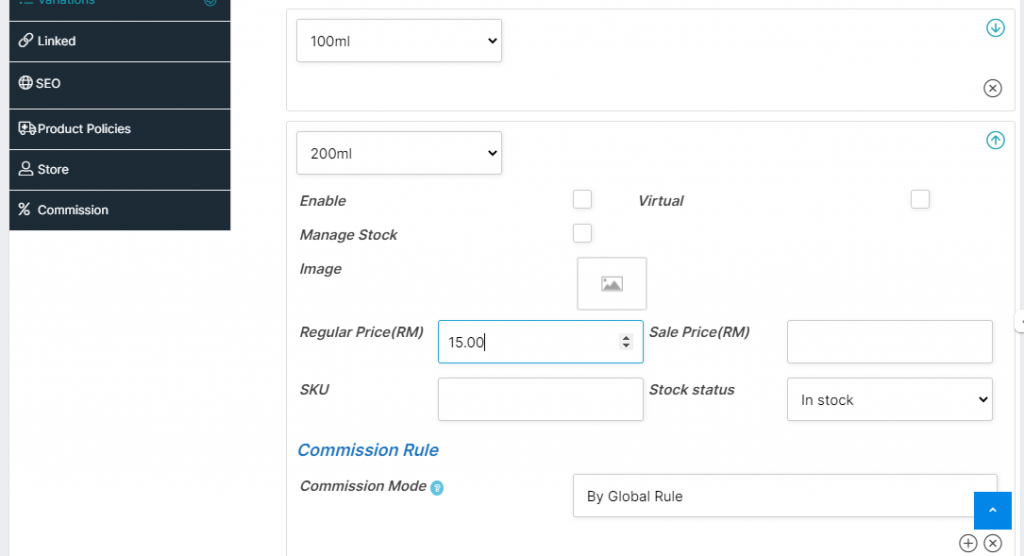
Then click the + again to enter price for 300ml.
Once done enter submit button. Now you have successfully added a product. Now the product will have different variations to show to the customer.
Add as many products or services as you like. Please spend some time to go through all the options. Once you understand the options you can create an advanced online store for your business.
Good Luck and if you need help, reach us through the contact us page.